This tutorial will help you port the STM32CubeWL firmware library to the Generic Node Sensor Edition.
The following figure shows the top view of NUCLEO-WL55JC1 (left) and Generic Node Sensor Edition (right).
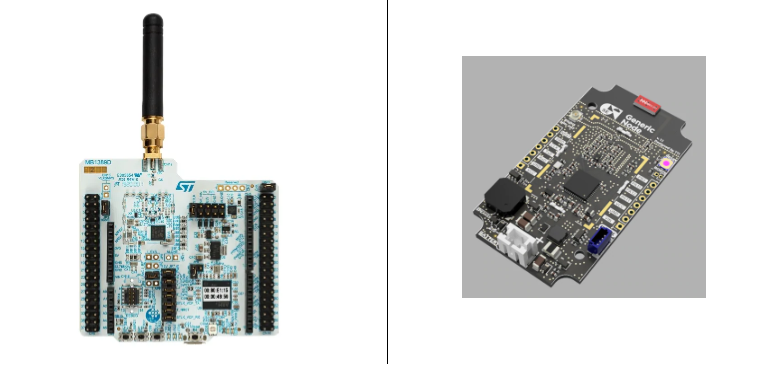
The STM32CubeWL firmware library contains templates, examples, applications, and demonstrations for supported boards including NUCLEO-WL55JC1. The applications written for NUCLEO-WL55JC1 (based on STM32WL55JC) can be modified to run on Generic Node Sensor Edition (based on STM32WL55CCU6) because both boards belong to the same device subfamily and have the same memory size. However, these boards have different pin counts: NUCLEO-WL55JC1 has 73 pins while Generic Node Sensor Edition has 48 pins.
Prerequisites
-
Software: Download and install the following software if your operating system does not already have one.
-
Hardware: You will require the following hardware and accessories.
- Generic Node Sensor Edition
- ST-LINK V3
- Jumper wires (M/F)
- Two AA batteries
- micro USB cable
Downloading STM32CubeWL firmware package
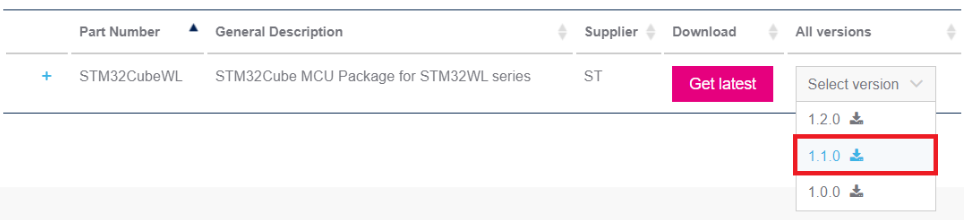
The STM32CubeWL firmware package comes in a single ZIP file. First, download the v1.1.0 and extract it into the folder of your choice.
Connecting to ST-LINK
The easiest way to connect Generic Node Sensor Edition to the ST-LINK V3 is by using male/female jumper wires. The table below provides an overview of which pins to connect:
| Pin function | ST-LINK V3 | Generic Node Sensor Edition |
|---|---|---|
| +3.3V | VCC | VCC |
| Ground | GND | GND |
| Clock | CLK | CLK |
| Data | DIO | SWD |
| Reset | NRST | NRST |
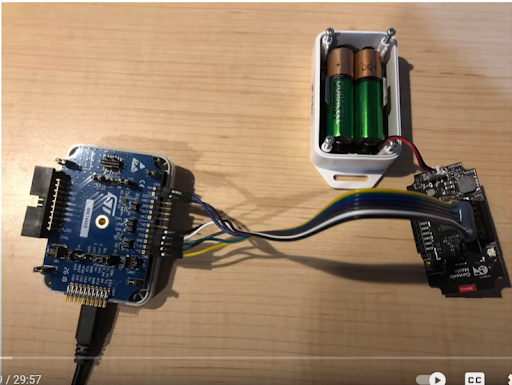
Insert batteries to the battery compartment. Then connect ST-LINK V3 to your computer using the micro USB cable. Once finished your hardware setup looks something like this:
Finding DevEUI
The DevEUI of your Generic Node Sensor Edition is stored in the registry location 0x1fff7580. The DevEUI that’s printed behind the enclosure is the Secure Element’s DevEUI and it is being used for the out-of-the-box demo app. In this case, you can also use that value as well.
- Start STM32CubeProgrammer.
- Click the Connect button.
- Enter the address, the size of the data, and the data width to be read, and then click on the Read button in the top-left corner.
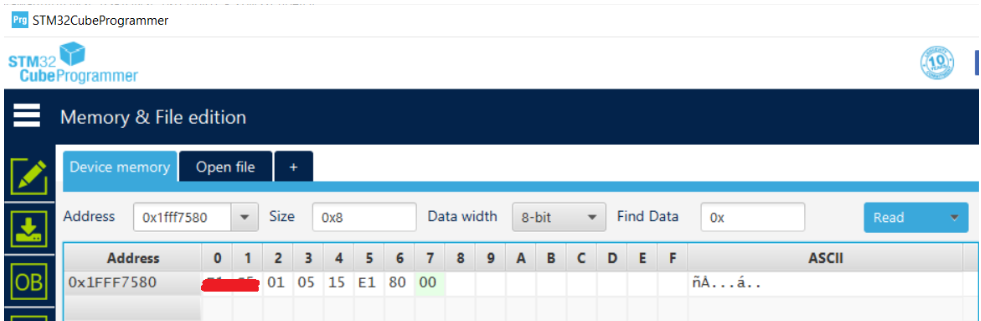
Note that the bytes are in little-endian format. So you can write the DevEUI as 00 80 E1 15 05 01 XX XX which is in big-endian format.
Adding your Generic Node Sensor Edition to The Things Stack
Follow the instructions on Adding Devices page to add your Generic Node Sensor Edition to The Things Stack.
- AppEUI - fill with zeros for testing purposes.
- DevEUI - use the DevEUI you retrieve from the above section.
- AppKey - select the Generate button.
Opening the Demo Application
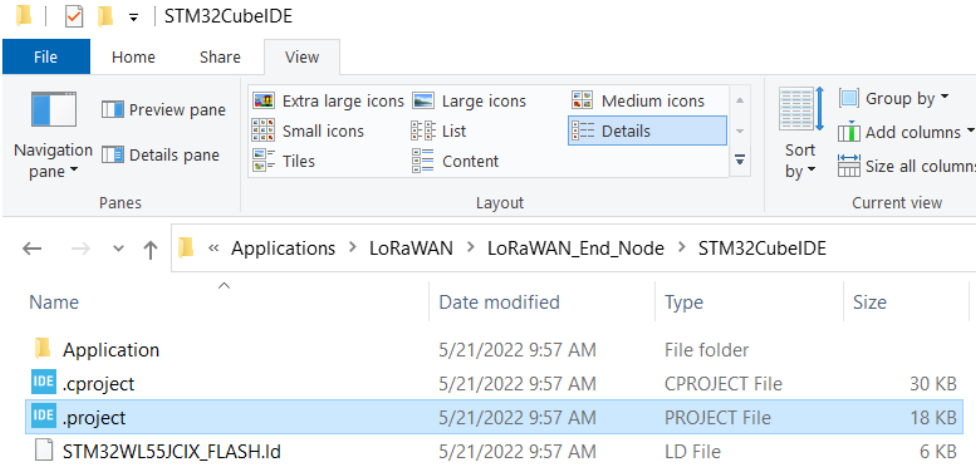
Open the single-core project, LoRaWAN_End_Node which is a demo application that is found in the STM32CubeWL firmware library.
-
In the System Explorer navigate to
STM32Cube_FW_WL_V1.1.0\Projects\NUCLEO-WL55JC\Applications\ LoRaWAN\LoRaWAN_End_Node\STM32CubeIDE. -
Double click on the
.projectfile.
- This should launch the STM32CubeIDE.
Building the Project
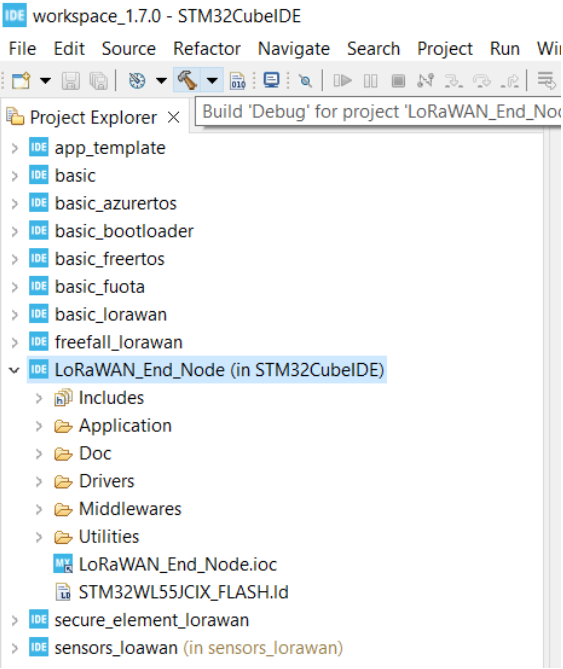
- In Project Explorer, choose the project node, LoRaWAN_End_Node.
- On the menu bar, choose Project > Build Project, or on the toolbar, select the hammer button.
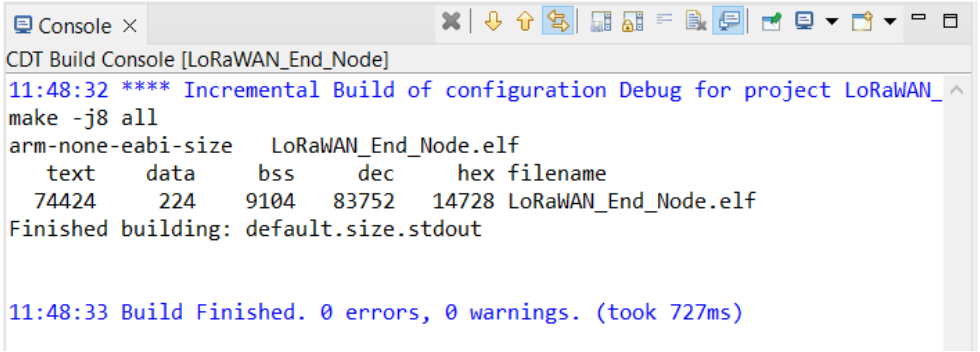
- The Console window displays the results of the build. The build succeeded.
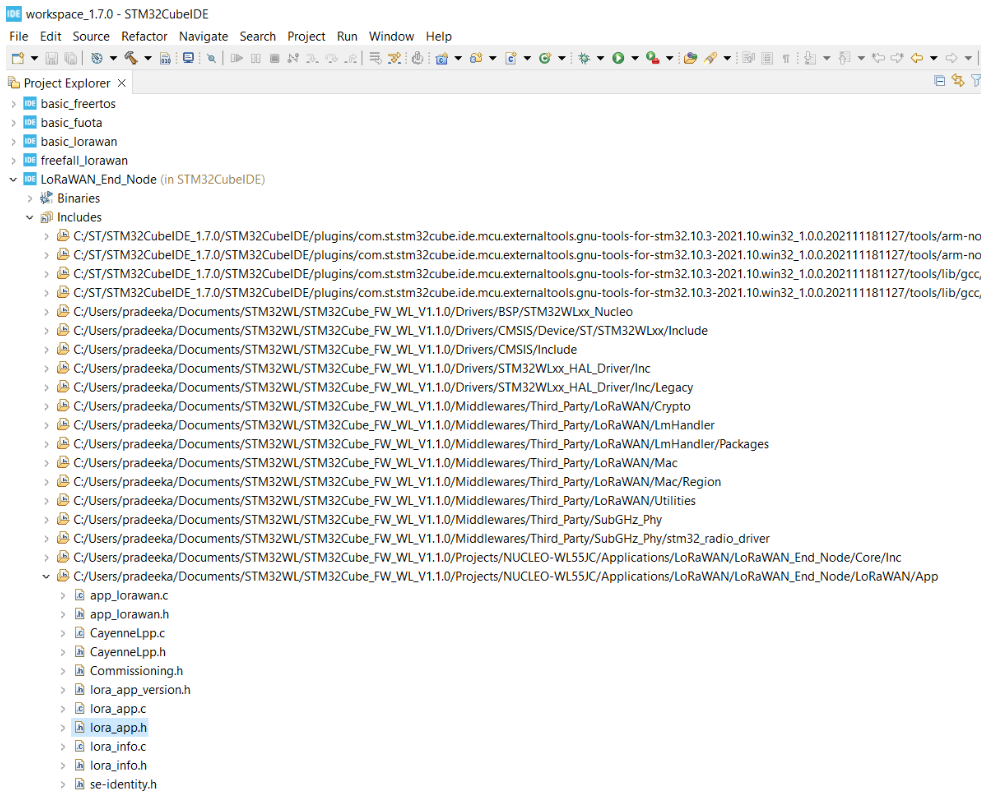
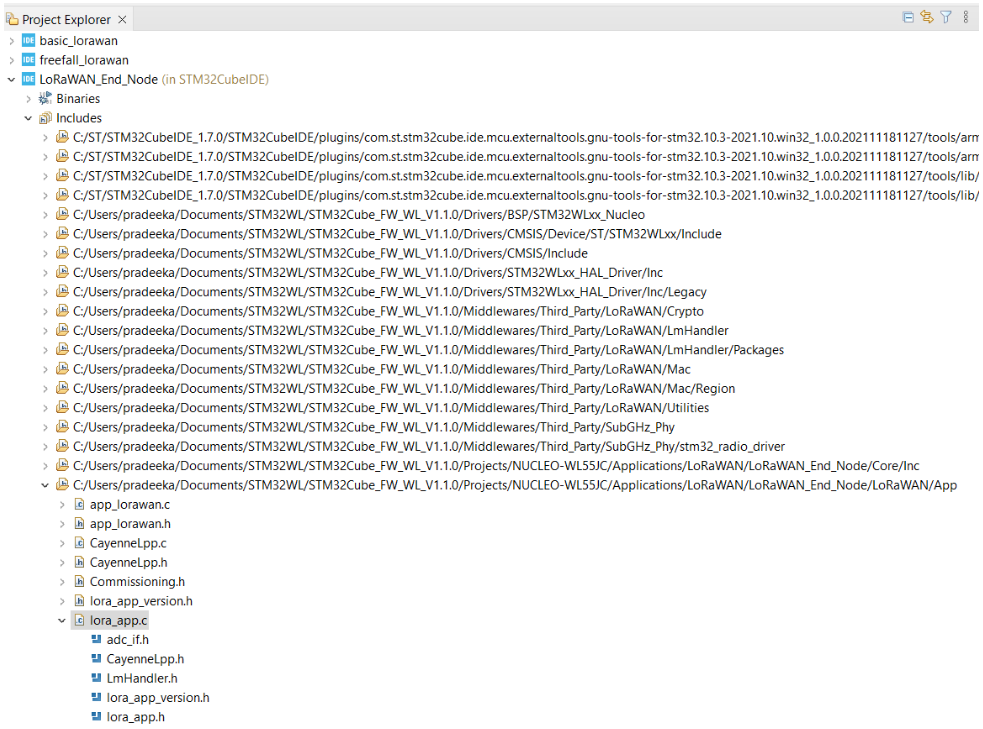
In Project Explorer, expand LoRaWAN_End_Node > includes > STM32Cube_FW_WL_V1.1.0\Projects\NUCLEO-WL55JC\Applications\LoRaWAN\LoRaWAN_End_Node\LoRaWAN\App. Then double click on the lora_app.h file.
- Edit line 43 to match your LoRaWAN region.
/* LoraWAN application configuration (Mw is configured by lorawan_conf.h) */
#define ACTIVE_REGION                               LORAMAC_REGION_EU868
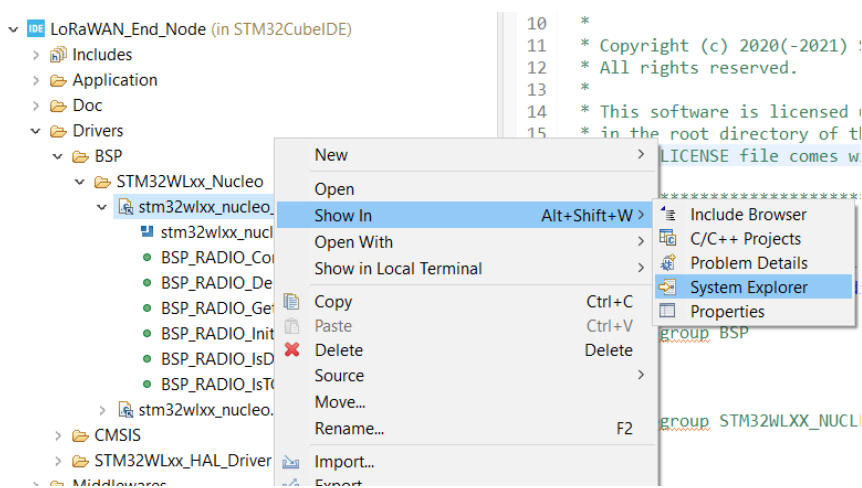
- In Project Explorer expand LoRaWAN_End_Node > Drivers > BSP > STM32WLxx_Nucleo. Right-click on the
stm32wlxx_nucleo_radio.cfile and from the shortcut menu select Show In > System Explorer.
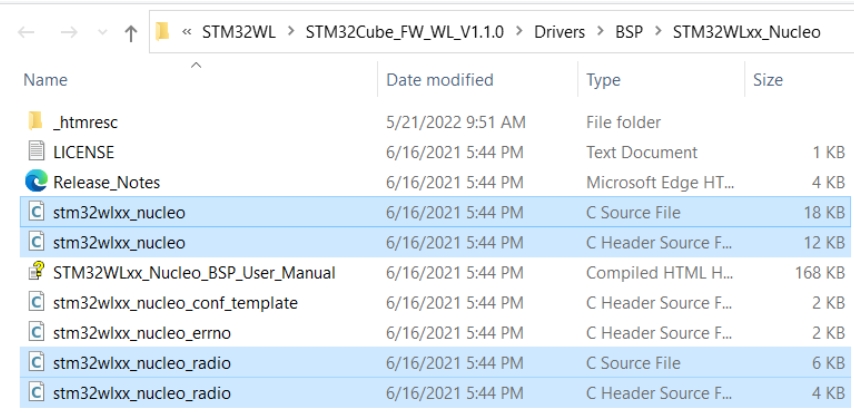
- In System Explorer select the following files:
- stm32wlxx_nucleo.c
- stm32wlxx_nucleo.h
- stm32wlxx_nucleo_radio.c
- stm32wlxx_nucleo_radio.h
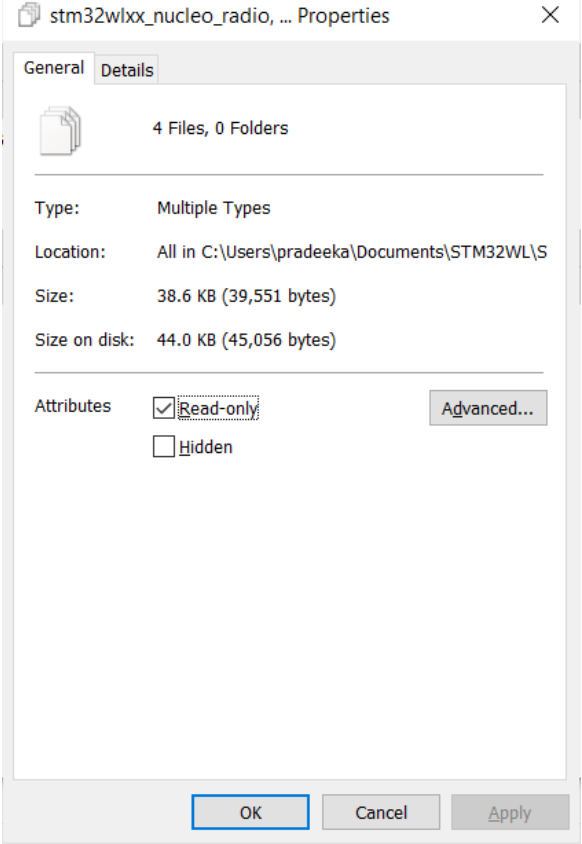
- Right-click on the selected files and select Properties from the menu. In the Properties window remove the Read-only attribute. When you are done select the Apply button and then select the OK button.
-
Double click on
stm32wlxx_nucleo_radio.cfile and then in Outline view double click onstm32wlxx_nucleo_radio.hfile. -
In the
stm32wlxx_nucleo_radio.hfile, modify the RF switch GPIOs to match with the Generic Node Sensor Edition (line 84 - 97). Here is the pin mapping between NUCLEO-WL55JC and the Generic Node Sensor Edition.
| RF SWITCH | NUCLEO-WL55JC1 | Generic Node Sensor Edition |
|---|---|---|
| RF_CTRL1 | PC4 | PA0 |
| RF_CTRL2 | PC5 | PA1 |
| RF_CTRL3 | PC3 | PB8 |
#define RF_SW_CTRL3_PIN                          GPIO_PIN_8
#define RF_SW_CTRL3_GPIO_PORT                    GPIOB
#define RF_SW_CTRL3_GPIO_CLK_ENABLE()            __HAL_RCC_GPIOB_CLK_ENABLE()
#define RF_SW_CTRL3_GPIO_CLK_DISABLE()           __HAL_RCC_GPIOB_CLK_DISABLE()


#define RF_SW_CTRL1_PIN                          GPIO_PIN_0
#define RF_SW_CTRL1_GPIO_PORT                    GPIOA
#define RF_SW_CTRL1_GPIO_CLK_ENABLE()            __HAL_RCC_GPIOA_CLK_ENABLE()
#define RF_SW_RX_GPIO_CLK_DISABLE()              __HAL_RCC_GPIOA_CLK_DISABLE()


#define RF_SW_CTRL2_PIN                          GPIO_PIN_1
#define RF_SW_CTRL2_GPIO_PORT                    GPIOA
#define RF_SW_CTRL2_GPIO_CLK_ENABLE()            __HAL_RCC_GPIOA_CLK_ENABLE()
#define RF_SW_CTRL2_GPIO_CLK_DISABLE()           __HAL_RCC_GPIOA_CLK_DISABLE()
-
Save the file.
-
In Project Explorer expand LoRaWAN_End_Node > Drivers > BSP > STM32WLxx_Nucleo. Double click on
stm32wlxx_nucleo.cfile and then in the Outline view double click on thestm32wlxx_nucleo.hfile. In thestm32wlxx_nucleo.hfile, modify the GPIO pins for the RGB LED:
| LED | NUCLEO-WL55JC1 | Generic Node Sensor Edition |
|---|---|---|
| RED | PB11 (LED3) | PB5 |
| GREEN | PB9 (LED2) | PB6 |
| BLUE | PB15 (LED1) | PB7 |
#define LED1_PIN                                GPIO_PIN_7
#define LED1_GPIO_PORT                          GPIOB
#define LED1_GPIO_CLK_ENABLE()                  __HAL_RCC_GPIOB_CLK_ENABLE()
#define LED1_GPIO_CLK_DISABLE()                 __HAL_RCC_GPIOB_CLK_DISABLE()

#define LED2_PIN                                GPIO_PIN_6
#define LED2_GPIO_PORT                          GPIOB
#define LED2_GPIO_CLK_ENABLE()                  __HAL_RCC_GPIOB_CLK_ENABLE()
#define LED2_GPIO_CLK_DISABLE()                 __HAL_RCC_GPIOB_CLK_DISABLE()


#define LED3_PIN                                GPIO_PIN_5
#define LED3_GPIO_PORT                          GPIOB
#define LED3_GPIO_CLK_ENABLE()                  __HAL_RCC_GPIOB_CLK_ENABLE()
#define LED3_GPIO_CLK_DISABLE()                 __HAL_RCC_GPIOB_CLK_DISABLE()
- Change the button pin number from 3 to 0. This will remove the button functionality and just use a timer to send periodic messages.
| BUTTON | NUCLEO-WL55JC1 | Generic Node Sensor Edition |
|---|---|---|
| BUTTON 1 | PA0 | PB3 |
| BUTTON 2 | PA1 | N/A |
| BUTTON 3 | PC6 | N/A |
#define BUTTONn 0
-
Save the file.
-
In Project Explorer, expand LoRaWAN_End_Node > includes > STM32Cube_FW_WL_V1.1.0\Projects\NUCLEO-WL55JC\Applications\LoRaWAN\LoRaWAN_End_Node\LoRaWAN\App and then double click on the
lora_app.cfile.
- In Outline view double click on the
sys_conf.hfile.
- In
sys_conf.hfile, make the following changes. This will make sure the debugger doesn’t crash.
Enable the debugger (line 61):
#define DEBUGGER_ENABLED            **1**

Disable the low power mode (line 72):
#define LOW_POWER_DISABLE           **1**
Save the file and Rebuild the project.
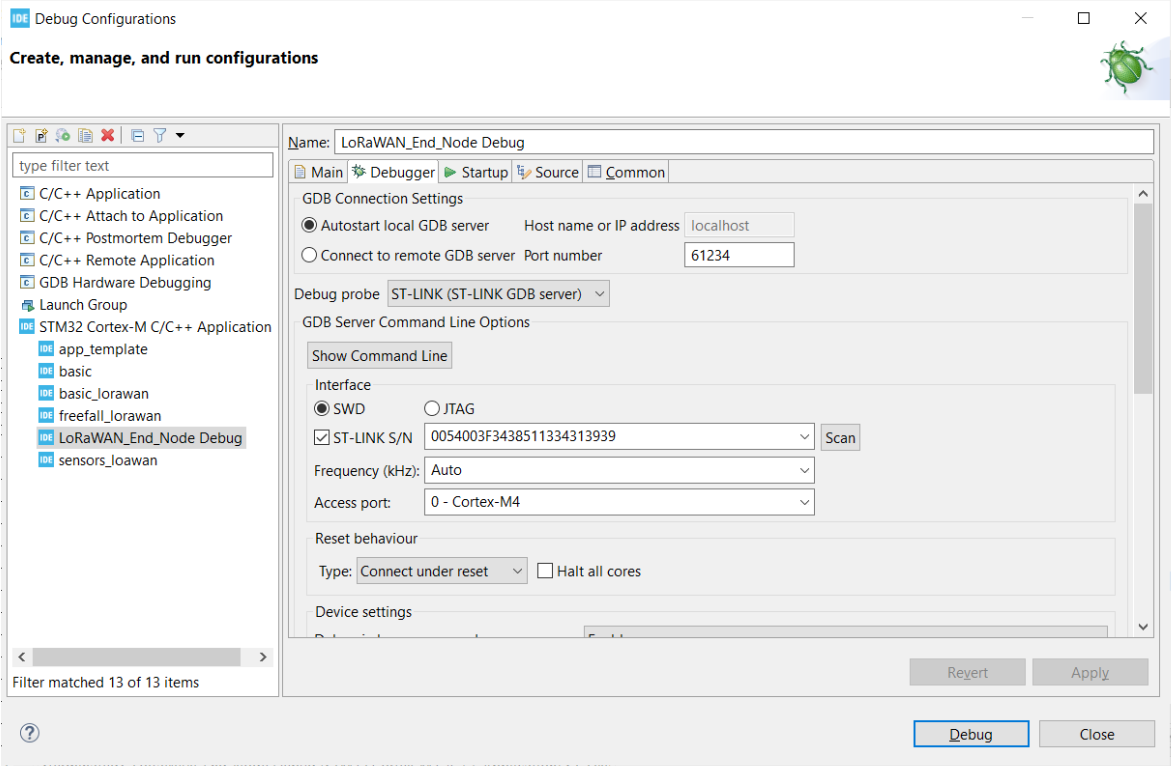
Debug Configurations
-
In Project Explorer, right-click on LoRaWAN_End_Node project, and on the menu bar, choose Debug As > Debug Configurations…
-
In Debug Configurations dialog box, select the New launch configurations button.
- A new node named LoRaWAN_End_Node Debug (you can modify this name anytime) will create under the STM32 Cortex-M C/C++ Application node.
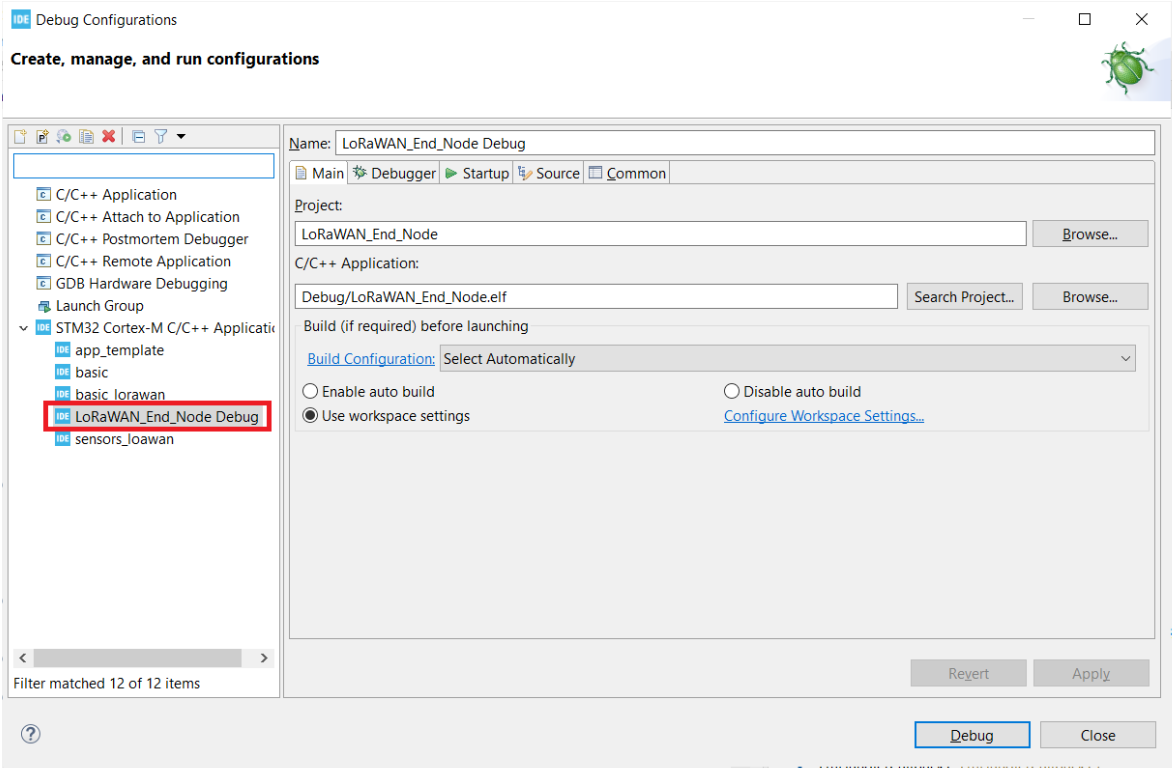
- Select the Debugger tab and make the following settings.
- GDB Connection Settings - Autostart local GDB server
- Debug probe - ST-LINK (ST-LINK GDB server)
- Interface - SWD
- Select the ST-LINK S/N checkbox and select the Scan button.
- Frequency - Auto
- Access port - 0 - Cortex-M4
LoRaWAN Network Commissioning Parameters
- In Project Explorer, expand LoRaWAN_End_Node > includes > STM32Cube_FW_WL_V1.1.0\Projects\NUCLEO-WL55JC\Applications\LoRaWAN\LoRaWAN_End_Node\LoRaWAN\App and then double click on the
se-identity.hfile.
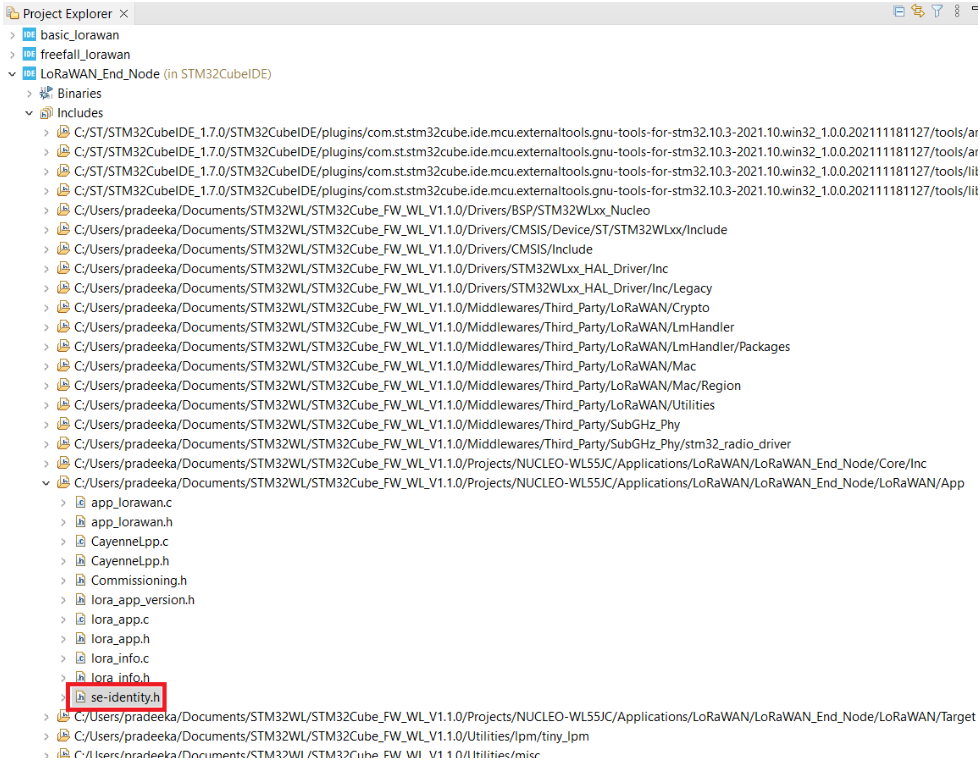
-
In the
se-identity.hfile,- replace JoinEUI (line 103) with the AppEUI that can be found in The Things Stack: Applications > your application > End devices > your end device > Overview. For example, if you have filled it with zeros, the code should be,
#define LORAWAN_JOIN_EUI { 0x00, 0x00, 0x00, 0x00, 0x00, 0x00, 0x00, 0x00 }- do not replace the DevEUI (line 98). Your DevEUI will automatically be set with a value provided by MCU.
- replace both AppKey (line 120) and NwkKey (line 125) with the AppKey that can be found in The Things Stack: Applications > your application > End devices > your end device > Overview.
-
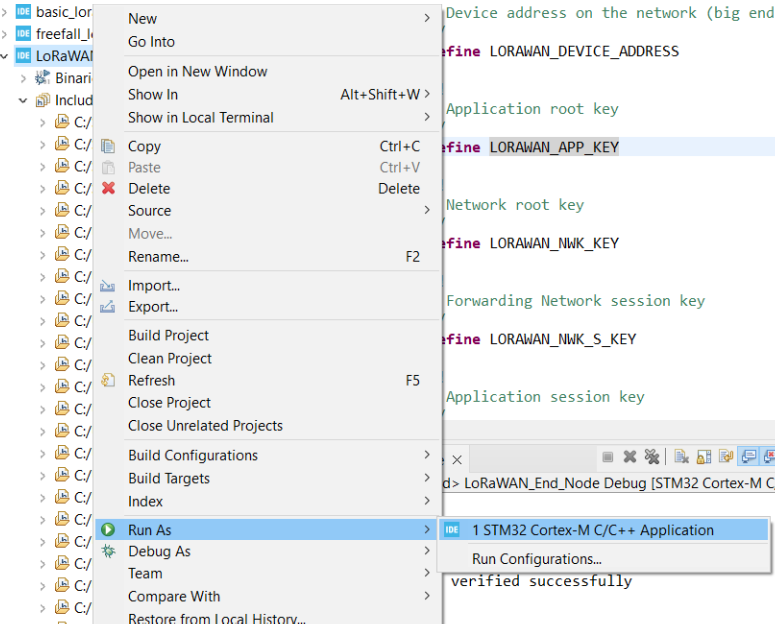
Once you have edited the file, build the project again.
-
Run the application by right-clicking on the LoRaWAN_End_Node project and from the shortcut menu select Run As > STM32 Cortex-M C/C++ Application.
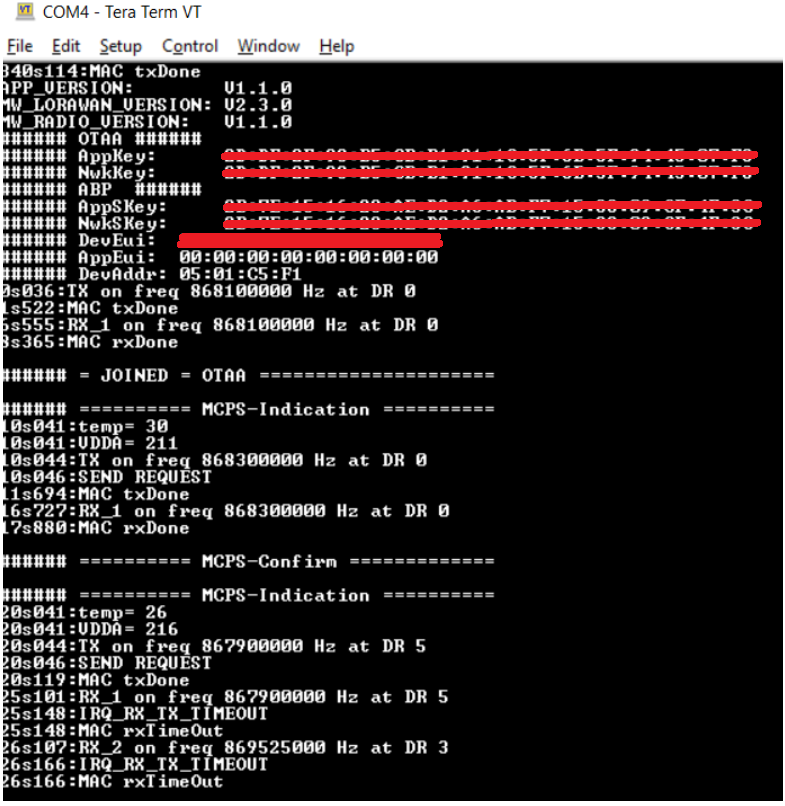
- Open Tera Term or any serial terminal program. You should see an output similar to the image capture below.
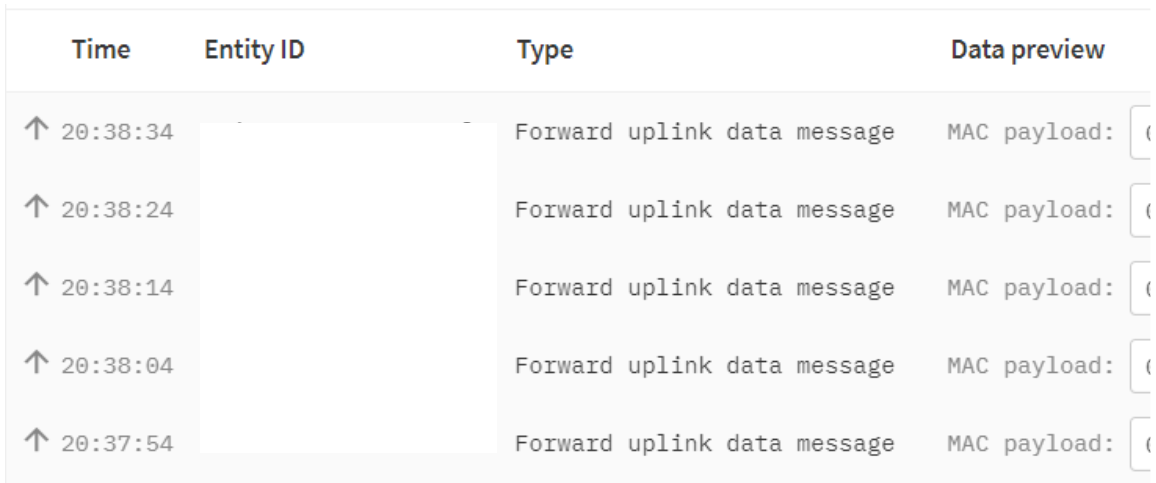
- In The Things Stackopen the Live data page. You will be able to see the messages coming from Generic Node Sensor Edition.
Note:
The code is written for extracting data from the sensors (humidity, light, pressure, temperature) on NUCLEO-WL55JC1. Since we haven’t still updated the code, the payload contains bogus sensor data.